previous page
The settings
No two storms have the same conditions. As such be prepared to change settings quickly if required. There is still a baseline on which to start. (this relates to digital)
The following are “checklist settings” always check these before shooting.
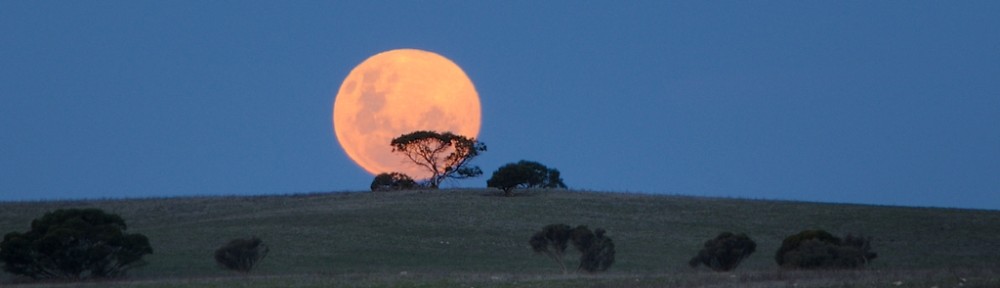
- ISO – Always set the ISO sensitivity to the lowest setting. This gives cleaner shots with less image noise and allows for longer exposures and greater quality if needed. The one real exception is when trying to freeze cloud structure when shooting individual cells. Multiple strikes can “ghost” the image as the storm cell moves. Short exposures to avoid this often do not catch enough light and higher ISO is then needed. THIS IMAGE is an example shot at ISO 1000 to freeze cloud structure. (this is an old pic. I have very few examples of this type of shot as good structure viewable in this way is somewhat rare in my part of the world)
- WHITE BALANCE – This can be tricky with multiple light sources that can cover the whole spectrum. Most cameras do quite well in the “auto” setting. However this is far from a good answer but a good starting point nonetheless. With experience you will be able to assess the scene and light source choosing the appropriate white balance preset. It pays to get out and experiment before a good storm comes along to understand what it is you are looking at. The best solution is shooting in RAW which gives the greatest flexibility as white balance disasters can be fixed later with no degradation to the image file. RAW also provides the best quality image files but is generally much larger in size requiring bigger (and faster write) memory cards. The tradeoff is well worth it in my opinion. So much so that jpeg simply should not be used if RAW is available. There is an also an option of 12 or 14 bit RAW files as well. 14 bit gives the greatest depth, but its hard to tell IMO.
- SHOT MODE – People automatically assume that to catch lightning you need to be quick and use continuous drive. For night time this is just not true, so leave your cam on single shot. This also allows you to delete “dud” pics on the fly thereby saving card space and saving work sorting out shots later on. Only delete though if time is on your side, if its firing then don’t bother! The price of memory
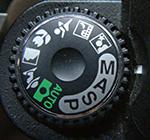
manual mode
cards is ever dropping and making this worry less of an issue anyway.
For daytime its a slightly different story. To capture the bolts you need as slower shutter as possible. To fast and you may well be too quick for the bolt! Achieving this is a fine balance between aperture and shutter. But its certainly achievable as you can see from this image HERE. (from this post) Many like to use lightning triggers and they do work. This article though is “focussed” on nighttime storms so wont go into any detail on this here. - MANUAL MODE – The key. using this setting allows full control over shutter and aperture!!
- MANUAL FOCUS TO INFINITY – At night its hard to impossible to get a focus lock. By doing this setting it allows you have the scene in focus at a given distance from the camera to infinity. The infinity mark is on your lens and looks like a sideways “8” See the image below. DON”T forget to switch OFF autofocus!
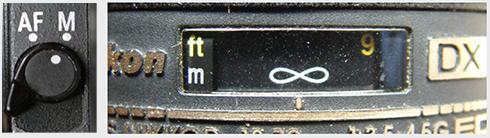
AF set to infinity
Aperture, Shutter and more…..
- APERTURE – Also known as “F” stop. This is vital. Most of my shots are in the F4- F7.1 range. This allows enough light gathering while preventing most “blow outs” from powerful or close bolts. These apertures often yield sharper images. F6.3 works the best for my “favourite” lens. Experiment with your lens to find the best.
In some circumstances it is fine to open the lens right up (low F number). If the storm is weak or strikes are a long distance away then more light is needed. This is best acheived by opening up the lens aperture as wide as it can go. Poor quality lenses are often soft and render lower quality images when wide open. There is the option of raising ISO to gather more light. But resist this unless absolutely necessary to keep images as clean as possible. Experiment with your particular lens to find out what it is capable of.
In almost all occasions closing the aperture too much (higher F numbers) will result in degraded images. Not only will not enough light be gathered to keep foreground detail but image sharpness drops off quickly as you approach the limit of your lens.
It does need to be mentioned that bolts that are “rain wrapped” will need higher apertures to limit image blowout. Experience will dictate the best compromise and has seen me go as high as F18 in one particular storm such was the power of the bolts and the position of the rain shafts.
In daytime end evening circumstances it will often be necessary to close up the aperture to achieve long enough exposures. This can wash out the bolts and leave softer images if you close up too far, as always experimentation and solid understanding of your equipment is essential. - SHUTTER – “leave her open!” This is of course limited by ambient light (such as cities etc), but the longer the shutter the better chance of capturing the strikes. Murphy’s law dictates that the best bolts will always occur when the shutter is closed so the more time open the better. I usually close the shutter after capturing one bolt or quick repeating sequence of bolts. Too many strikes in the one frame can look fake. This is my own personal preference. Have your image preview switched on so that on finishing the shot you can review the taken pic and decide whether or not to “keep or delete”. yes this does take a millisecond of time, but its quicker to do this that to have to swap memory cards at a critical moment because of a card full of crap pics. (footnote – memory cards are cheap and much larger these days and saving card space has become much less of an issue)
- FOCAL LENGTH – It is rare to use focal lengths below 24mm. (on a 1.5 crop DSLR) If you are then the storm is mighty close and you should be under cover! In general between 30 and 50mm is ideal. Of course this all depends on your and the storms location and the composition elements of the picture. I have shot storms from 18-300mm, but my best are between the aforementioned focal lengths. (**nb this is for the 1.5 crop sensor DSLR’s)

Manual mode
next page